Quick Start
Create a "Hello World" Data Process
This quick start will take you through a tutorial of building a simple data process in LOC Studio.
This data process won't do much - it responds to HTTP POST requests and return JSON-format greeting messages, which is similar to a RESTful API. But this will give you a clear idea of what's it like to develop and deploy logic and data processes in LOC.
This tutorial uses LOC Studio and takes about 5-10 minutes ⏱️ providing you already have an account set up and the LOC license is activated.
For example, if you invoke it with this JSON payload
{
    "name": "Arthur Dent"
}
The data process should responds with
{
    "message": "Hello, Arthur Dent!"
}
The whole "Hello World" data process would be like this:
Login LOC
First login LOC Studio:
See User Management for how to setup a new account in LOC. You may need to contact your LOC Studio administrator.
You will be automatically logged out after some time of inactivity.
Create Logic
Logic are modularised, reusable code components to be linked to data processes, which are created and managed seperatly with projects, scenarios and data processes. Each data process should links with at least one generic logic and only one aggregator logic. Generic logic will be executed by order and finally run the aggregator.
In the quickstart tutorial, our "Hello World" data process has one each generic and aggregator logic:
| Logic | Logic name | Description |
|---|---|---|
| Generic #1 | payload-json-parser | A general-purpose logic that parse trigger payload to JSON and stores it in session storage. |
| Generic #2 | greeting | A unique logic that reads from the parsed JSON to generate a greeting message. |
| Aggregator | result-aggregator | A general-purpose aggregator that generates the finalised result to be sent back to the invoker. |
In order to create and execute the data process, we'll need to create the three logic first. The two general-purpose logic are also reusable in our other tutorials.
Create a Generic Logic
Go to Cloud Logic panel under Data Pipeline/Logic:
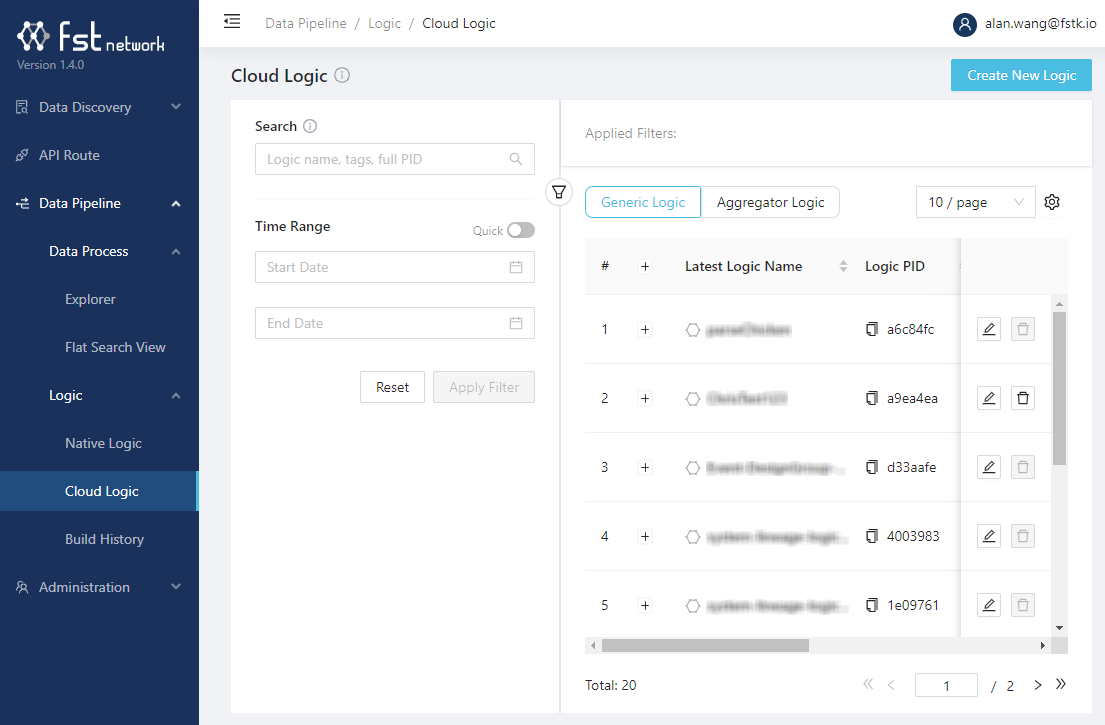
This panel shows you the list of existing generic or aggregator logic.
Click Create New Logic on the top-right corner:
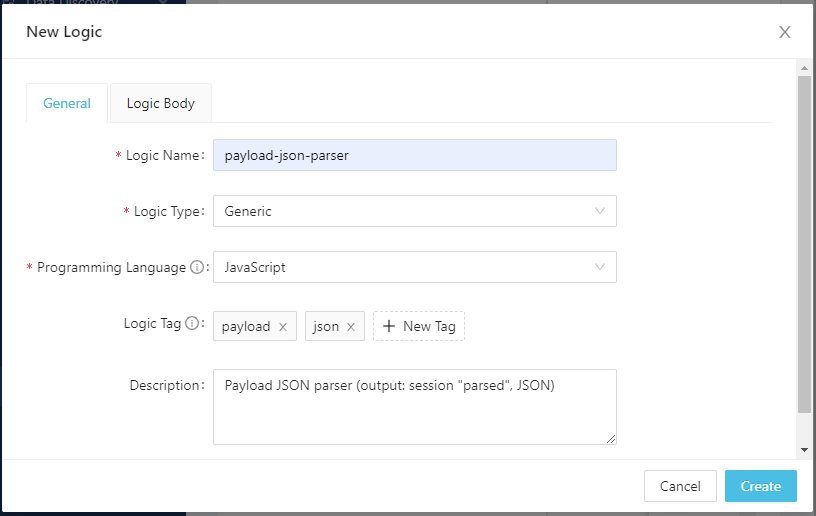
Key in the logic name and make sure the logic type is Generic. As for the language you can choose either JavaScript or TypeScript. Click Create to create the logic.
The name of the logic is required, whereas tags and description are entirely optional, so feel free to play with them. However, accurate tags and detailed description are more helpful for improving the usability and searchability of your logic.
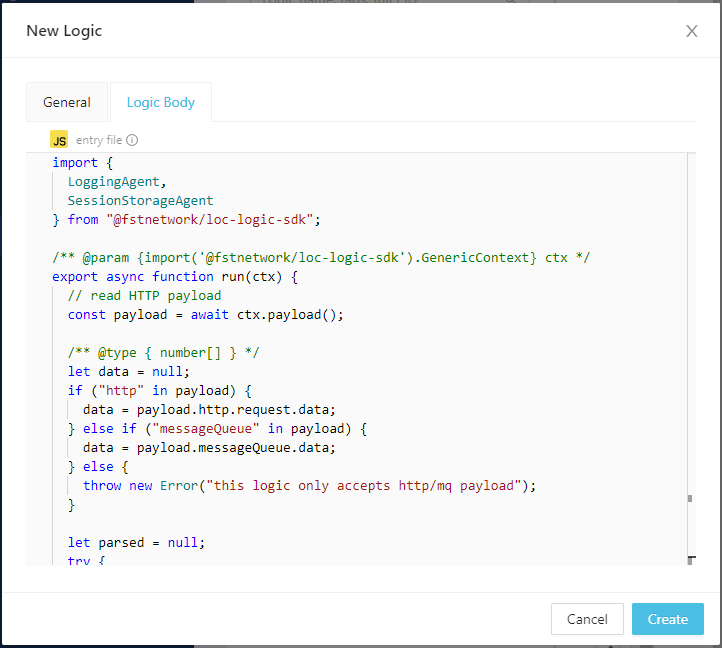
Click Logic Body on the top to input the logic code, copy and paste the code in the following section then click Create.
Generic logic: payload-json-parser
You can also find the source code here.
- JavaScript
- JavaScript (with JSDoc)
- TypeScript
import { LoggingAgent, SessionStorageAgent } from "@fstnetwork/loc-logic-sdk";

export async function run(ctx) {
    // read payload
    const payload = await ctx.payload();

    let data = null;
    if ("http" in payload) {
        data = payload.http.request.data;
    } else if ("messageQueue" in payload) {
        data = payload.messageQueue.data;
    } else {
        throw new Error("this logic only accepts http/mq payload");
    }

    let parsed = null;
    try {
        // decode body from Uint8Array to string and convert to JSON
        parsed = JSON.parse(new TextDecoder().decode(new Uint8Array(data)));
    } catch (e) {
        LoggingAgent.warn({
            error: true,
            errorMessage: `unable to parse JSON payload: ${e.message}`,
            stack: e.stack,
            taskKey: ctx.task.taskKey,
        });
    }

    // log parsed JSON
    LoggingAgent.info({ parsed: parsed });

    // write the parsed data into session storage
    await SessionStorageAgent.putJson("parsed", parsed);
}

export async function handleError(ctx, error) {
    // error logging
    LoggingAgent.error({
        error: true,
        errorMessage: error.message,
        stack: error.stack,
        taskKey: ctx.task.taskKey,
    });
}
import { LoggingAgent, SessionStorageAgent } from "@fstnetwork/loc-logic-sdk";

/** @param {import('@fstnetwork/loc-logic-sdk').GenericContext} ctx */
export async function run(ctx) {
    // read payload
    const payload = await ctx.payload();

    /** @type { number[] } */
    let data = null;
    if ("http" in payload) {
        data = payload.http.request.data;
    } else if ("messageQueue" in payload) {
        data = payload.messageQueue.data;
    } else {
        throw new Error("this logic only accepts http/mq payload");
    }

    let parsed = null;
    try {
        // decode body from Uint8Array to string and convert to JSON
        parsed = JSON.parse(new TextDecoder().decode(new Uint8Array(data)));
    } catch (e) {
        LoggingAgent.warn({
            error: true,
            errorMessage: `unable to parse JSON payload: ${e.message}`,
            stack: e.stack,
            taskKey: ctx.task.taskKey,
        });
    }

    // log parsed JSON
    LoggingAgent.info({ parsed: parsed });

    // write the parsed data into session storage
    await SessionStorageAgent.putJson("parsed", parsed);
}

/**
 * @param {import('@fstnetwork/loc-logic-sdk').GenericContext} ctx
 * @param {import('@fstnetwork/loc-logic-sdk').RailwayError} error
 */
export async function handleError(ctx, error) {
    // error logging
    LoggingAgent.error({
        error: true,
        errorMessage: error.message,
        stack: error.stack,
        taskKey: ctx.task.taskKey,
    });
}
JavaScript with JSDoc annotations is still JavaScript; however it can enable type checking intellisense in Studio and local editors like VS Code. See CLI Handbook for how to develop locally.
import {
    GenericContext,
    RailwayError,
    LoggingAgent,
    SessionStorageAgent,
} from "@fstnetwork/loc-logic-sdk";

export async function run(ctx: GenericContext) {
    // read payload
    const payload = await ctx.payload();

    let data: number[] = [];
    if ("http" in payload) {
        data = payload.http.request.data;
    } else if ("messageQueue" in payload) {
        data = payload.messageQueue.data;
    } else {
        throw new Error("this logic only accepts http/mq payload");
    }

    let parsed = null;
    try {
        // decode body from Uint8Array to string and convert to JSON
        parsed = JSON.parse(new TextDecoder().decode(new Uint8Array(data)));
    } catch (e) {
        LoggingAgent.warn({
            error: true,
            errorMessage: `unable to parse JSON payload: ${e.message}`,
            stack: e.stack,
            taskKey: ctx.task.taskKey,
        });
    }

    // log parsed JSON
    LoggingAgent.info({ parsed: parsed });

    // write the parsed data into session storage
    await SessionStorageAgent.putJson("parsed", parsed);
}

export async function handleError(ctx: GenericContext, error: RailwayError) {
    // error logging
    LoggingAgent.error({
        error: true,
        errorMessage: error.message,
        stack: error.stack,
        taskKey: ctx.task.taskKey,
    });
}
Clicking Create will add the logic to the logic list and build (compile) the code with LOC's logic compiler.
The code editor automatically format code on paste. You can also press hot keys in the code box to format the code (adding correct indentations, etc.):
- Windows:
Alt+Shift+F - macOS:
Shift+Option+F - Linux:
Ctrl+Shift+I
If your code is built successfully, you should see it in the Cloud Logic list as below:
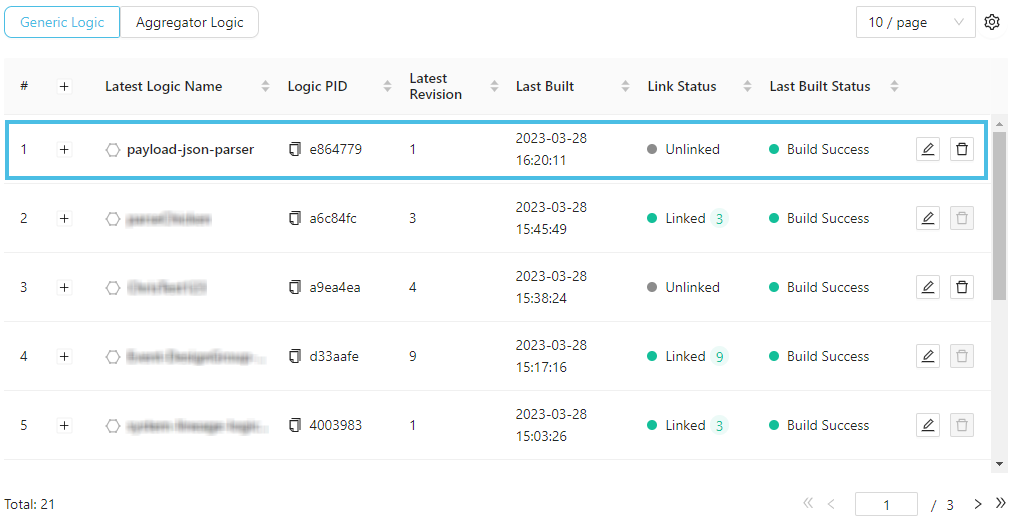
You can also click on the logic name to inspect its details or add a new revision:
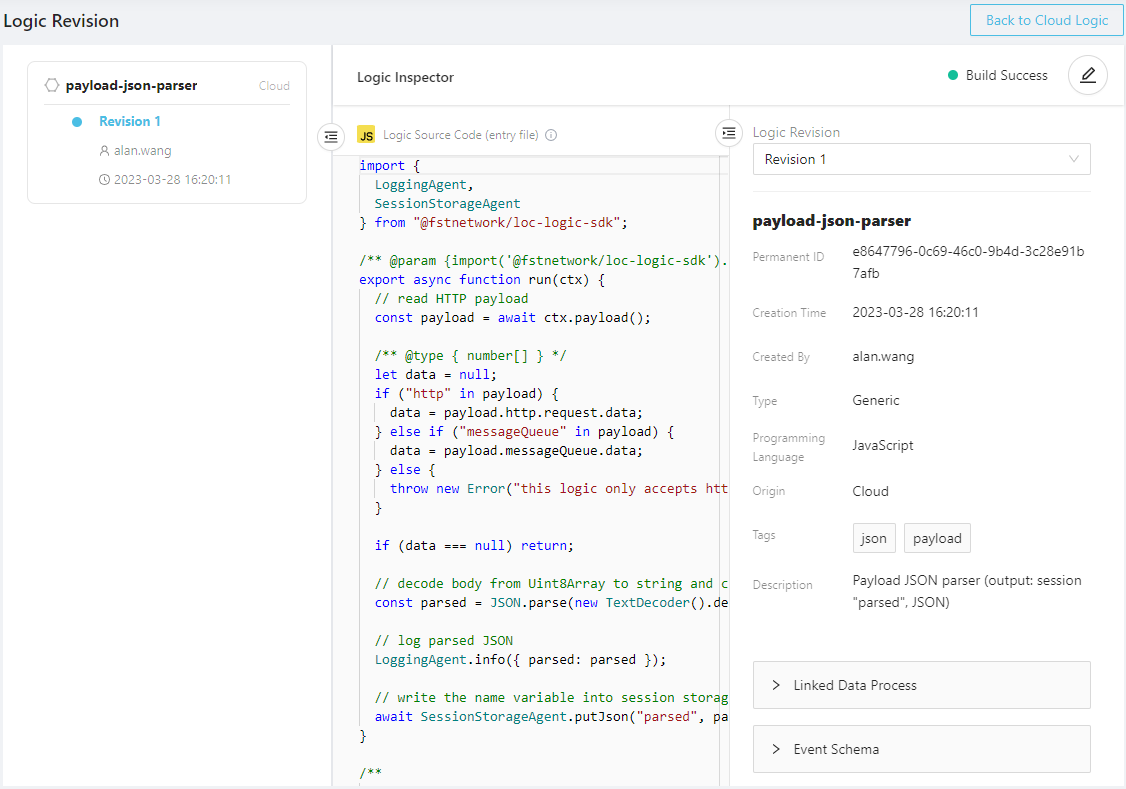
Revisions of a logic represent its versions and editing history, which also ensures that your data process won't break if they depends on older versions.
Now create two other logic (one generic and one aggregator) in the same way. Below are the example code for both:
Generic logic: greeting
- JavaScript
- JavaScript (with JSDoc)
- TypeScript
import { LoggingAgent, SessionStorageAgent } from "@fstnetwork/loc-logic-sdk";

export async function run(ctx) {
    // read parsed payload from session
    const parsed = await SessionStorageAgent.get("parsed");

    // extract name field (and set it to a default string "World" if not exist)
    const name = parsed?.name || "World";

    // logging
    LoggingAgent.info({ name: name });

    // write the result (in a JSON object) to session
    await SessionStorageAgent.putJson("result", {
        message: `Hello, ${name}!`,
    });
}

export async function handleError(ctx, error) {
    // error logging
    LoggingAgent.error({
        error: true,
        errorMessage: error.message,
        stack: error.stack,
        taskId: ctx.task.taskKey,
    });
}
import { LoggingAgent, SessionStorageAgent } from "@fstnetwork/loc-logic-sdk";

/** @param {import('@fstnetwork/loc-logic-sdk').GenericContext} ctx */
export async function run(ctx) {
    // read parsed payload from session
    /** @type { { name: string } } */
    const parsed = await SessionStorageAgent.get("parsed");

    // extract name field (and set it to a default string "World" if not exist)
    const name = parsed?.name || "World";

    // logging
    LoggingAgent.info({ name: name });

    // write the result (in a JSON object) to session
    await SessionStorageAgent.putJson("result", {
        message: `Hello, ${name}!`,
    });
}

/**
 * @param {import('@fstnetwork/loc-logic-sdk').GenericContext} ctx
 * @param {import('@fstnetwork/loc-logic-sdk').RailwayError} error
 */
export async function handleError(ctx, error) {
    // error logging
    LoggingAgent.error({
        error: true,
        errorMessage: error.message,
        stack: error.stack,
        taskId: ctx.task.taskKey,
    });
}
import {
    GenericContext,
    RailwayError,
    LoggingAgent,
    SessionStorageAgent,
} from "@fstnetwork/loc-logic-sdk";

export async function run(ctx: GenericContext) {
    // read parsed payload from session
    const parsed = (await SessionStorageAgent.get("parsed")) as {
        name: string;
    };

    // extract name field (and set it to a default string "World" if not exist)
    const name = parsed?.name || "World";

    // logging
    LoggingAgent.info({ name: name });

    // write the result (in a JSON object) to session
    await SessionStorageAgent.putJson("result", { message: `Hello, ${name}!` });
}

export async function handleError(ctx: GenericContext, error: RailwayError) {
    // error logging
    LoggingAgent.error({
        error: true,
        errorMessage: error.message,
        stack: error.stack,
        taskId: ctx.task.taskKey,
    });
}
Aggregator logic: result-aggregator
You can also find the source code here.
For aggregator logic, you must select the logic type as Aggregator in the logic creation window. Otherwise you wouldn't be able to add it into your data process.
- JavaScript
- JavaScript (with JSDoc)
- TypeScript
import {
    ResultAgent,
    LoggingAgent,
    SessionStorageAgent,
} from "@fstnetwork/loc-logic-sdk";

export async function run(ctx) {
    // read result from session
    const result = await SessionStorageAgent.get("result");

    // logging
    LoggingAgent.info({ result: result });

    // finalise result
    ResultAgent.finalize({
        status: "ok",
        taskKey: ctx.task.taskKey,
        data: result,
    });
}

export async function handleError(ctx, error) {
    const err = {
        error: true,
        errorMessage: error.message,
        stack: error.stack,
        taskKey: ctx.task.taskKey,
    };

    // error logging
    LoggingAgent.error(err);

    // finalise result
    ResultAgent.finalize(err);
}
import {
    ResultAgent,
    LoggingAgent,
    SessionStorageAgent,
} from "@fstnetwork/loc-logic-sdk";

/** @param {import('@fstnetwork/loc-logic-sdk').AggregatorContext} ctx */
export async function run(ctx) {
    // read result from session
    /** @type { any } */
    const result = await SessionStorageAgent.get("result");

    // logging
    LoggingAgent.info({ result: result });

    // finalise result
    ResultAgent.finalize({
        status: "ok",
        taskKey: ctx.task.taskKey,
        data: result,
    });
}

/**
 * @param {import('@fstnetwork/loc-logic-sdk').AggregatorContext} ctx
 * @param {import('@fstnetwork/loc-logic-sdk').RailwayError} error
 */
export async function handleError(ctx, error) {
    const err = {
        error: true,
        errorMessage: error.message,
        stack: error.stack,
        taskKey: ctx.task.taskKey,
    };

    // error logging
    LoggingAgent.error(err);

    // finalise result
    ResultAgent.finalize(err);
}
import {
    AggregatorContext,
    RailwayError,
    ResultAgent,
    LoggingAgent,
    SessionStorageAgent,
} from "@fstnetwork/loc-logic-sdk";

export async function run(ctx: AggregatorContext) {
    // read result from session
    const result = (await SessionStorageAgent.get("result")) as any;

    // logging
    LoggingAgent.info({ result: result });

    // finalise result
    ResultAgent.finalize({
        status: "ok",
        taskKey: ctx.task.taskKey,
        data: result,
    });
}

export async function handleError(ctx: AggregatorContext, error: RailwayError) {
    const err = {
        error: true,
        errorMessage: error.message,
        stack: error.stack,
        taskKey: ctx.task.taskKey,
    };

    // error logging
    LoggingAgent.error(err);

    // finalise result
    ResultAgent.finalize(err);
}
With all three logic created, we can move to creating the data process itself.
Build the Data Process
Create a Project and a Scenario
In order to create a data process in LOC Studio, we'll first need a project and scenario.
Go to the Explorer panel under Data Pipeline/Data Process, right click on one of the unit and select + Create Project:
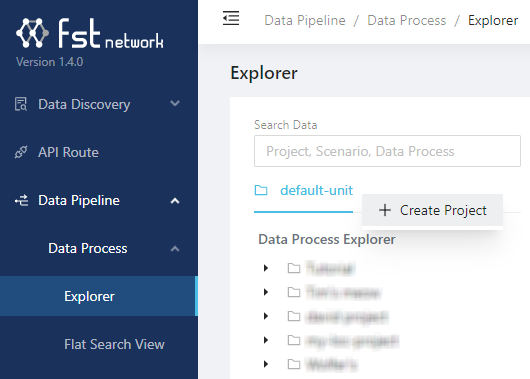
Give your project a name and some description (optional):

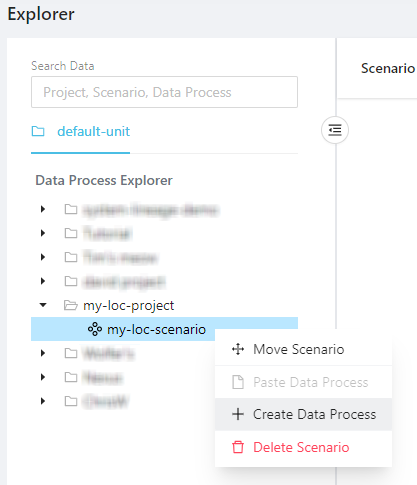
Then right click on the project to create a scenario under it (again, give it a name and optional descriptions).
Create a Data Process
Right click on the scenario and select +Create Data Process:
Like the logic, name is required for a data process with optional tags and descriptions:
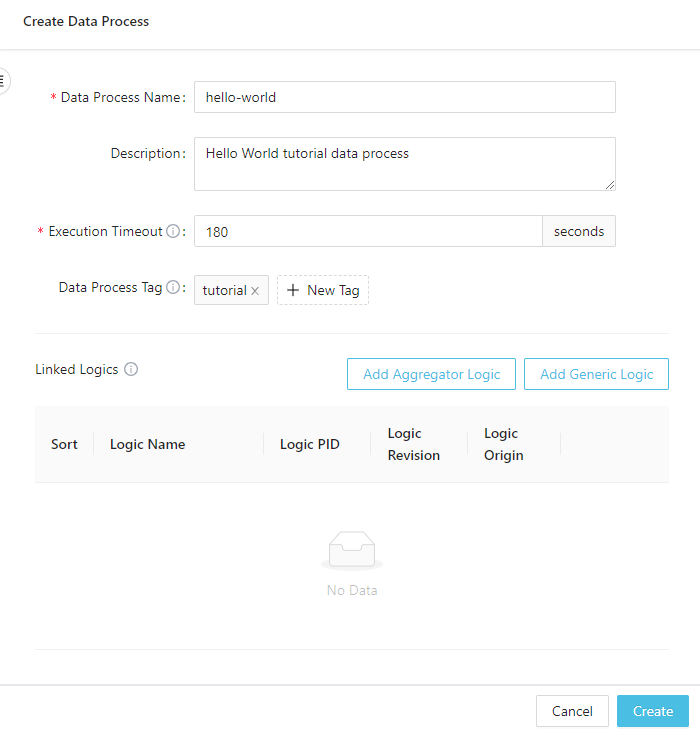
Execution timeout is how long LOC runtime should wait for the data process to finish the task. The available range is 6~300 seconds.
Link Logic to the Data Process
In the lower part of the data process creation window, click the Add Generic Logic button. Studio will prompt you to select a generic logic:
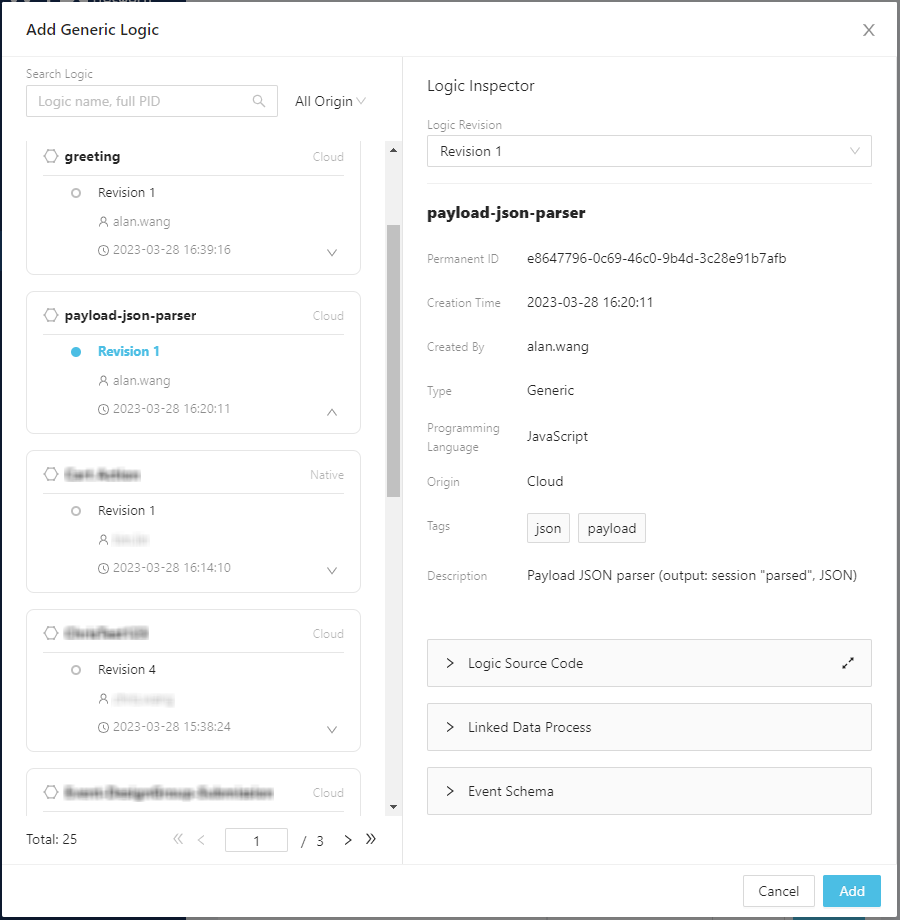
Add the three logic (two generic and one aggregator) to the data process:
If a selected logic have more than one revisions, make sure you've selected the one you want. You can also change the revision in the data process editing window afterwards (see below).
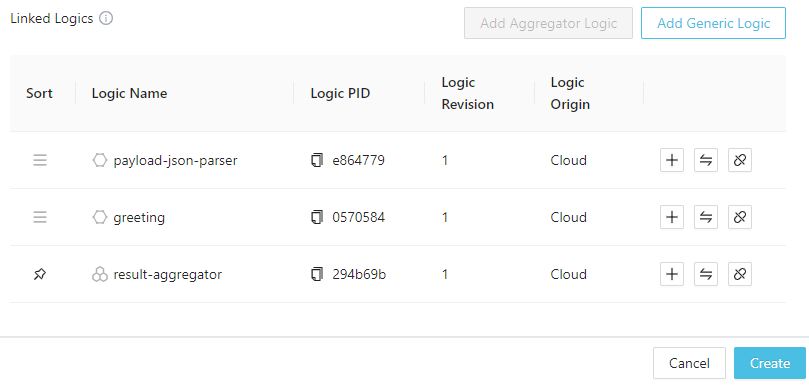
Make sure your logic order is correct, then click Create.
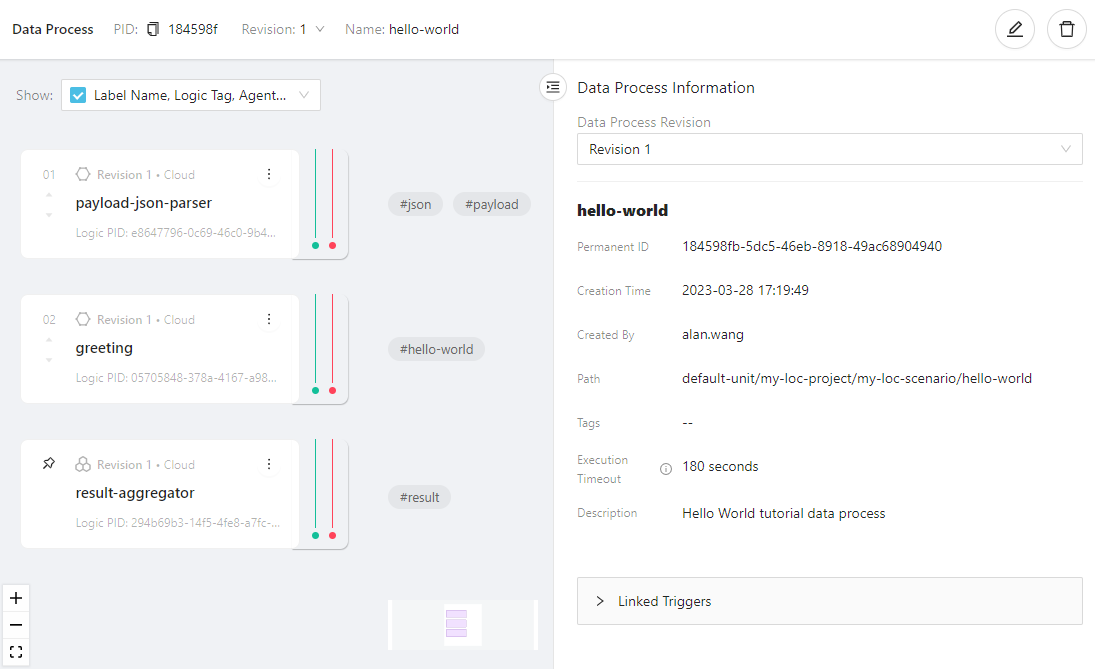
You can see that all three logic and the data process have unique permanent identity (PID) numbers. You can also edit the data process, which will create a new revision.
All revisions of one data process or logic shares the same PID.
Changing Logic Revisions in a Data Process
To use a new revision of a logic in a data process, enter edit mode then move the mouse to the upper right corner of the logic and select Change Revision:
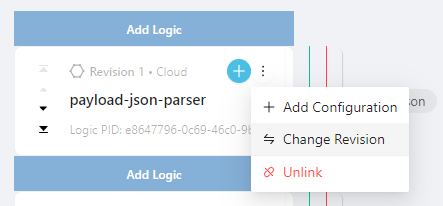
Select the new revision and save the changes.
Run the Data Process - Simple Data Process Execution
We can execution the data process with so-called simple data process execution, which is in fact using a mock API route trigger (simulating an incoming HTTP POST request).
Check out our other tutorials to see how to deploy a real API route on LOC.
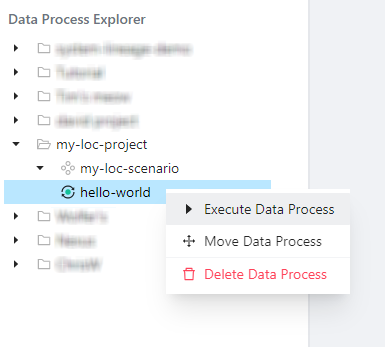
Right click your data process and select Execute Data Process:
Studio will prompt you to provide a text file which contains "payload data":
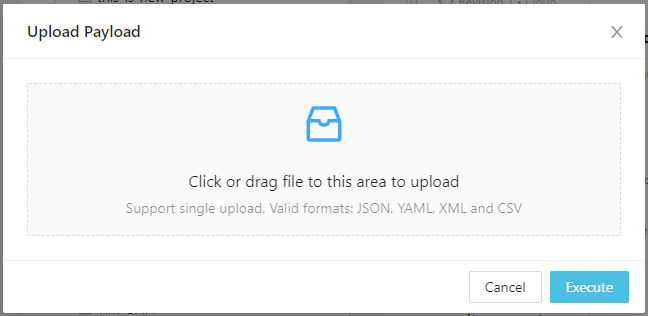
In our case we can upload a .json file containing the JSON payload:

Finally click Execute.
The result should show up momentarily:
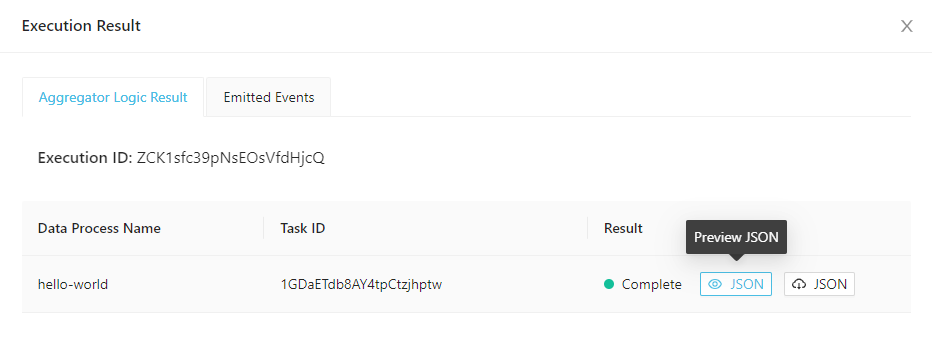
We can see the execution ID, task ID as well as the finalised result returned by the aggregator logic (by clicking the Preview JSON button):
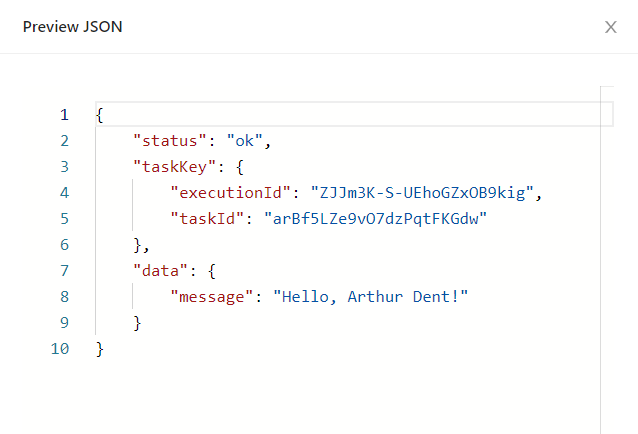
The content under the response field is exactly as what we expected - an included greeting message generated by three logic linked together in the "Hello World" data process.
What would happen if you execute the data process right away with no payload? Our payload-json-parser logic is designed to skip parsing error, and greet logic would thus fall back to "World" as the default name (outputing "Hello, World!").
For how to properly invoke a data process with an API route trigger (HTTP endpoint), see Create and Use an API Route Trigger.
What's Next?
Now you've deployed your first data process in LOC, where should you go next in the docs?
- First proceed to Tutorials, which offers basic examples on specific topics and activities for you to try in LOC Studio.
- The tutorials also point you to various pages in Studio Guide and SDK Reference for additional details.
- If you are a developer, you'll need to learn about CLI, which can do more and makes debugging easier - CLI Handbook plus SDK Reference have everything you need.
- See System FAQs if you'd like to know more about LOC.
Happy developing!